Disassembling Hp 530 laptop
First of all, turn off the notebook and remove the battery.
STEP 1.
Remove the memory and hard drive covers from the bottom of the notebook.

You will find the wireless card under the memory cover.

STEP 2.
Remove one screw securing the CD/DVD optical drive. Push the drive from the laptop with a small screwdriver.
Remove the optical drive.

STEP 3.
Pull the hard drive assembly to the left to disconnect it from the motherboard. Remove the hard drive assembly.

STEP 4.
When you replace the top cover, you don’t have to remove memory modules and wireless card, but it’s necessary to disconnect the wireless card antenna cables from the card.
Disconnect both Wi-Fi antennas from the wireless card.

STEP 5.
Remove eleven (yellow) screws from the bottom of the notebook. These screws are securing the switch cover (power button cover).
Remove two (red) screws. These two screws securing the display panel assembly.
Remove two (orange) screws. These two screws securing the keyboard.

STEP 6.
Turn the laptop over and start removing the switch cover. If you cannot separate the cover from the base, you can use a piece of plastic (I’m using a guitar pick).
Insert the guitar pick between the switch cover and base and carefully lift up the cover. Continue removing the cover with your fingers.

The switch cover has been removed.

STEP 7.
You removed two screws securing the keyboard in the step 5. Now you can lift up the keyboard from the base.

Place the keyboard so you can access the cable connector underneath.

In order to unlock the connector, you’ll have to move the brown locking clip towards the display panel. Move it about 2-3 millimeters, not more. The locking clip must stay attached to the connector base.
Now you can release the keyboard cable and remove the keyboard.
WARNING! If you break the keyboard connector, you’ll have to replace the motherboard.
Need a replacement keyboard for HP 530 notebook? Find a new keyboard here.

STEP 8.
Disconnect the video cable from the motherboard.
Pull the wireless antenna cable through the hole in the motherboard. You disconnected these cables from the wireless card in the step 4.
Remove two screw securing the display panel hinges. You removed two more screws securing the display panel in the step 5.

Remove the display panel assembly from the notebook base.

You can find the LCD screen removal instruction in the official service guide for HP 530 notebooks. Take a look on the page 49.
Search here for new LCD screens.
STEP 9.
Disconnect the switch board cable from the motherboard. Unlock the connector the same way as you unlocked the keyboard connector in the step 7.
Remove one screw securing the switch board.
Remove the switch board.

STEP 10.
Remove all remaining screws from the bottom.

STEP 11.
Disconnect the touch pad cable from the motherboard.

STEP 12.
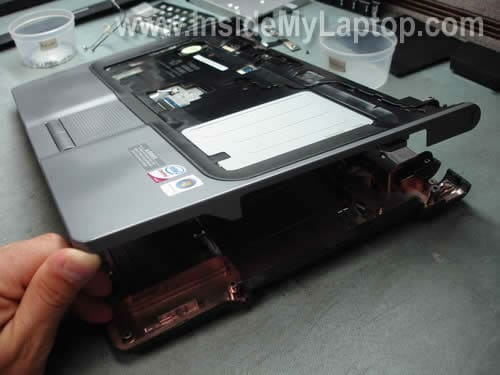
Start separating the top cover from the notebook base.

Continue separating the top cover from the base.
By the way, in a HP 530 notebook PC the motherboard is attached to the top cover, not to the base assembly as a most other notebooks.

Remove the base cover.

STEP 13.
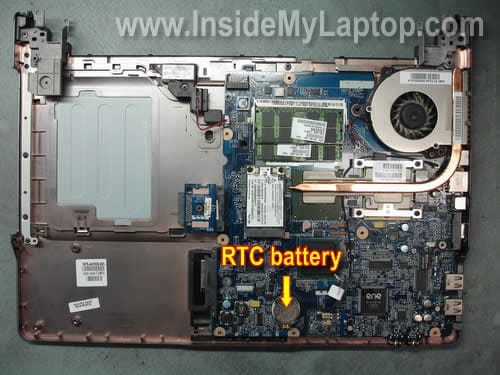
The base cover has been removed.
Now you can access and replace the RTC (CMOS) battery if needed.

STEP 14.
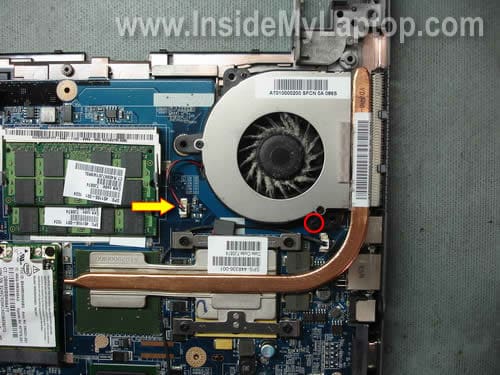
Remove one screw securing the cooling fan.
Disconnect the cooling fan cable from the motherboard.

Remove the cooling fan.
Here are replacement cooling fans.

STEP 15.
Loosen four screws securing the heat sink.

Remove the heat sink.
In my laptop the heat sink was clogged with dust and needed a good cleaning.
After the heat sink is removed, you can access and remove the processor (CPU) if needed. I’ll leave the processor attached to the motherboard.

STEP 16.
Disconnect the speaker cable.
Remove one screw securing the motherboard to the top cover.

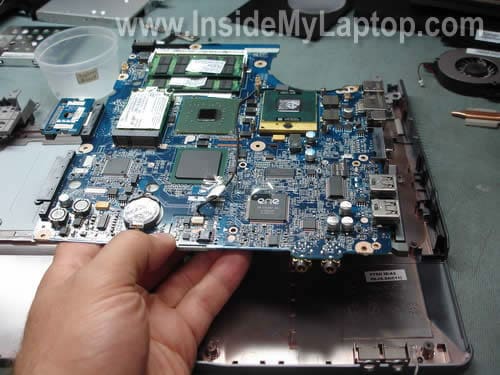
Start removing the motherboard from the top cover.

The motherboard has been removed.

STEP 17.
The touch pad is attached to the top cover and secured by a metal bracket. I’m not removing the touch pad because when you buy a new top cover it comes with the cover.

Now you can replace the top cover assembly with a new one.

You can find a new top cover assembly (with touch pad) using the HP spare number. In my